Some modellers are pretty capable when it comes to natural metal finishes, others can get pretty turned off by the concept, but generally, silver paint looks like silver paint no matter what you do - even if some of these finishes are quite a bit more convincing than most. Arguably, the most effective form of a natural metal finish is exactly that - metal. Aluminium foil has been used to finish a natural metal model at times and it is extremely realistic. You get a lot of bang for your buck in terms of realism versus difficulty; it's not a difficult process, just a little labour intensive and at times a bit tedious, depending on the level of surface detail you want. Natural metal betrays pretty much every little blemish that exists under, in or on top of it, regardless of your medium of choice. But, again, using metal to simulate metal actually works (!) and it's not difficult to do. Just needs a little patience and attention to detail, and if you couldn't supply these, you'd be staring at a TV screen right now instead contemplating your next natural metal project. So, read on, you experimenter, you!
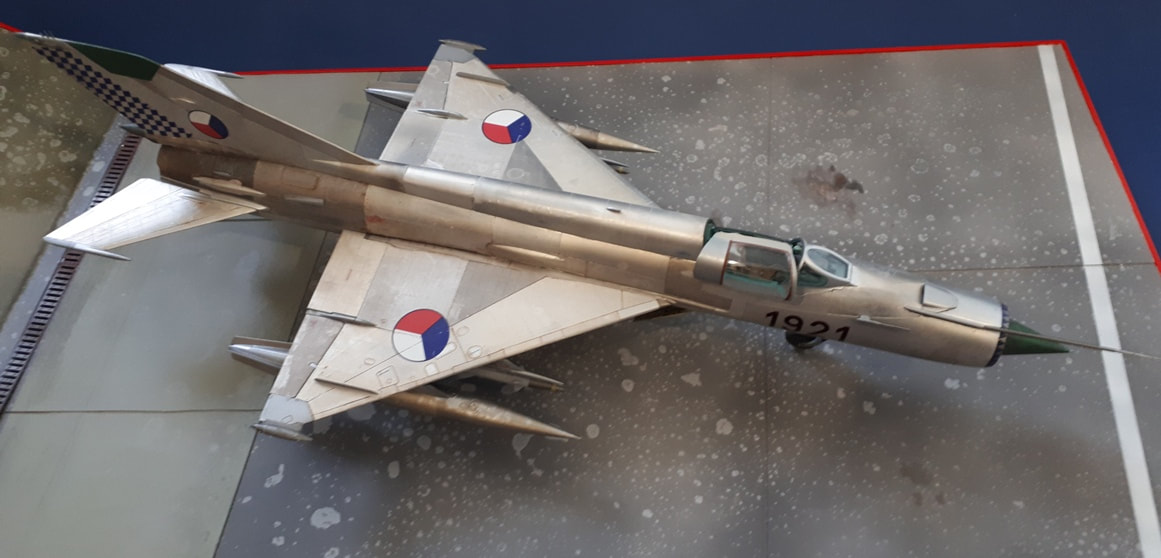
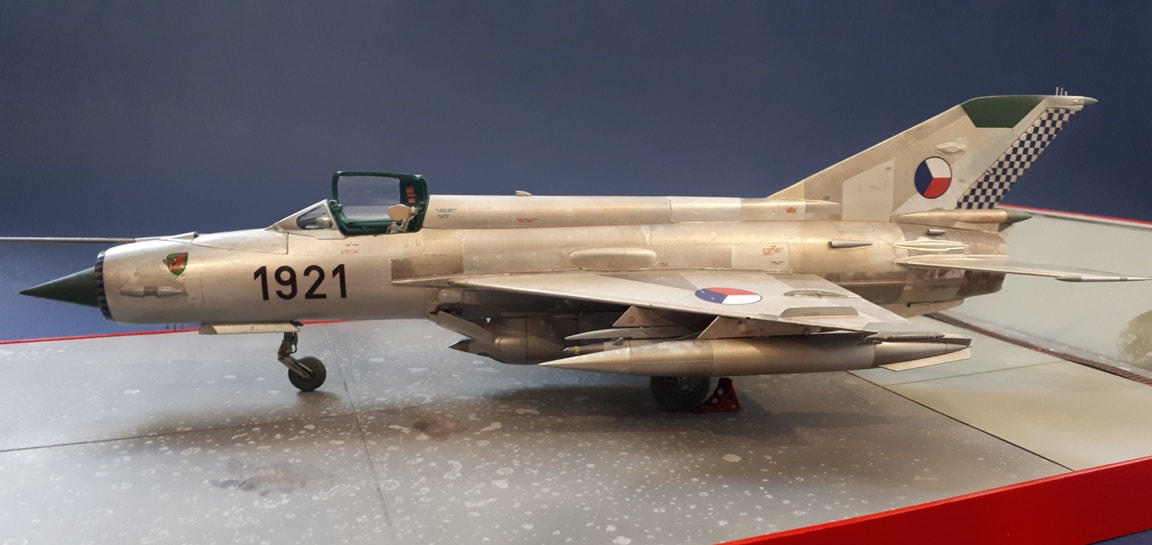
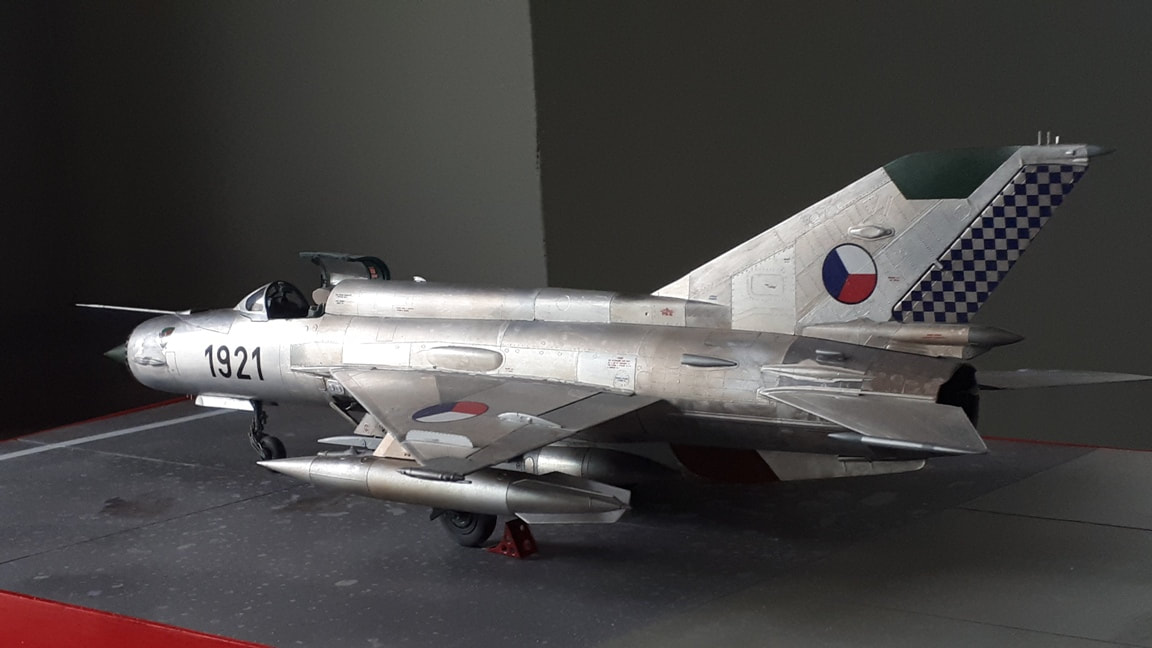
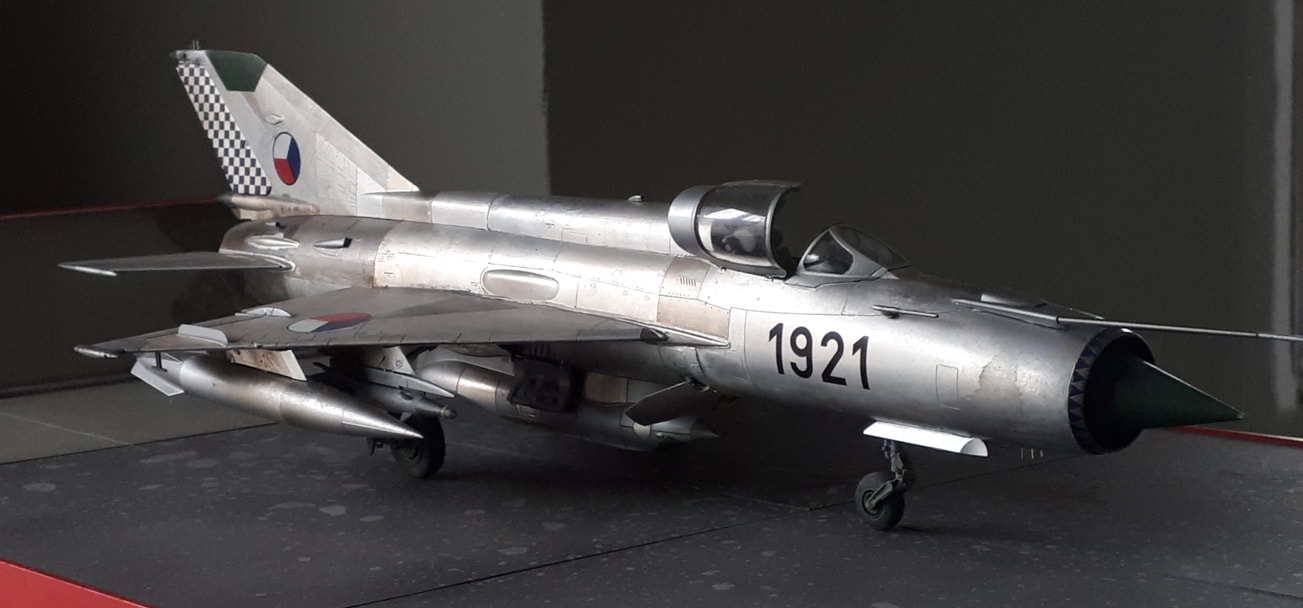
The tools you need are pretty standard items with which you are most likely already proficient with at a master level. You may, and probably should, want to detail the surface of your model. Rivets should be visible on a finish like this, unless the rivets and panel lines were puttied over in the interest of maximum aerodynamic efficiency. In the interest of making the model more interesting, I tend to lean towards representing rivets, not typically giving much priority to weather or not they were visible on the real article and from what distance. The other thing, in my opinion, is that scale effect is a very real concept applicable to scale modelling. That means that I am not very likely to pick a fight with you after the show in the parking lot over your specific use of RLM02. In the case of this MiG-21 (which is an 'R' version, by the way), I know that the natural metal panels are a little over-exaggerated and didn't shine like aluminium foil. I over-exaggerated the panel shades to a degree I deemed subtle, because I wanted to stay away from silver monotony, and on a scaled down model that required a subtle correspondingly scaled-up exaggeration of the differences between panels. It's part of the interpretive aspect of the art. As for the shine, I coated the end product with a clear flat.
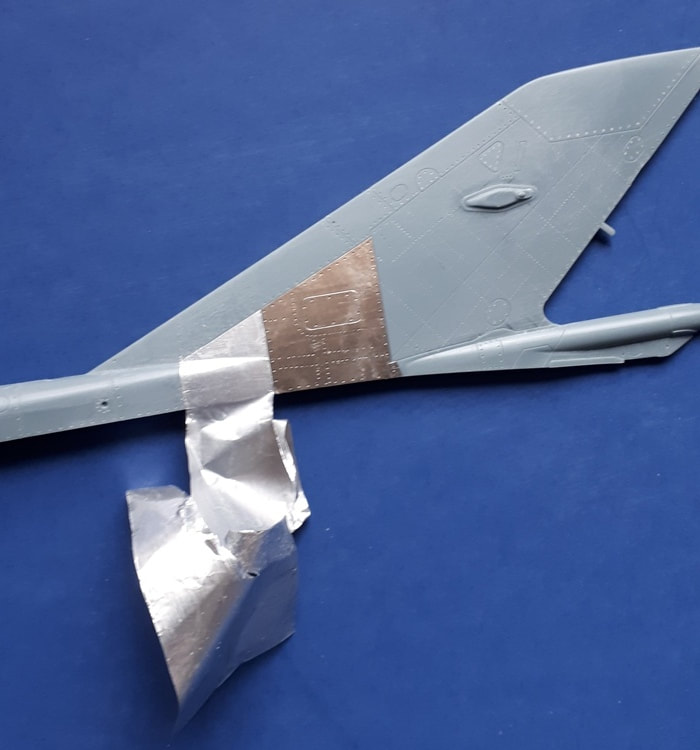
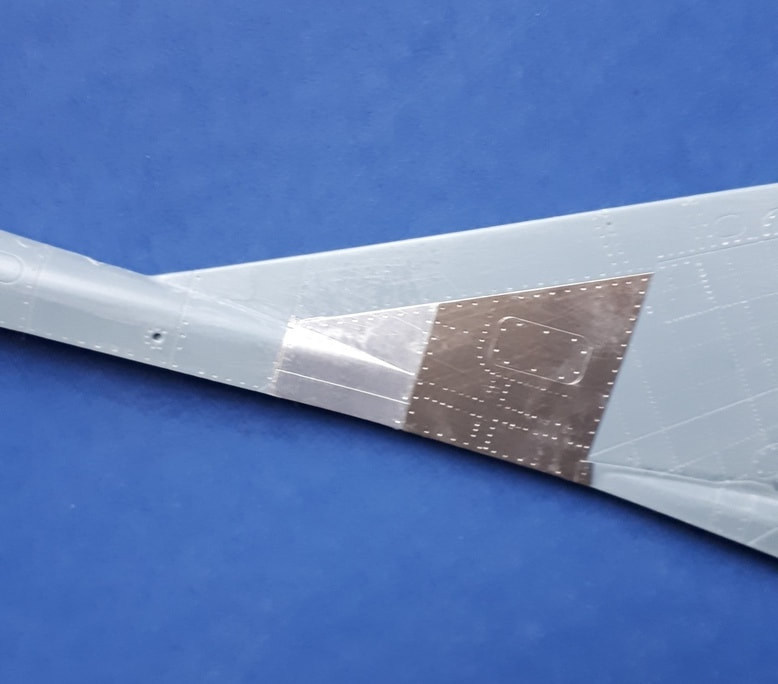
The images here show a vertical fin section of the Eduard 1:48th scale MiG-21R kit. By the way, the kit's a gem and has nice surface detail to begin with, but I wanted the finer panel lines represented, since these would be shown off by my chosen scheme. I armed myself with the references that would show me where the rivets and rivet patterns were, and carefully went over the plastic with the riveting tool. I have seen articles where the model was foiled first and THEN riveted, but I reversed the procedure, because a slip over the foil requires removal of the foil and then the inevitable fixup of the plastic.
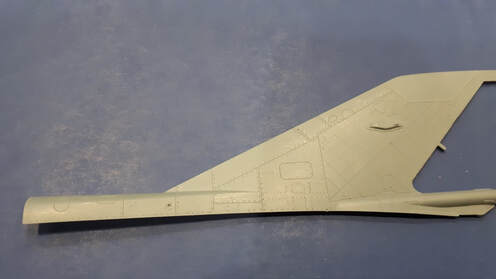
The riveting tool I use doesn't yield round rivets, so I went over each and every one with the tip of a compass needle. Little pressure is needed to make a round indent, and after these were done, the plastic was sanded down from about 400 grit sandpaper to I think 1500. After that, the surface was cleaned with rubbing alcohol.
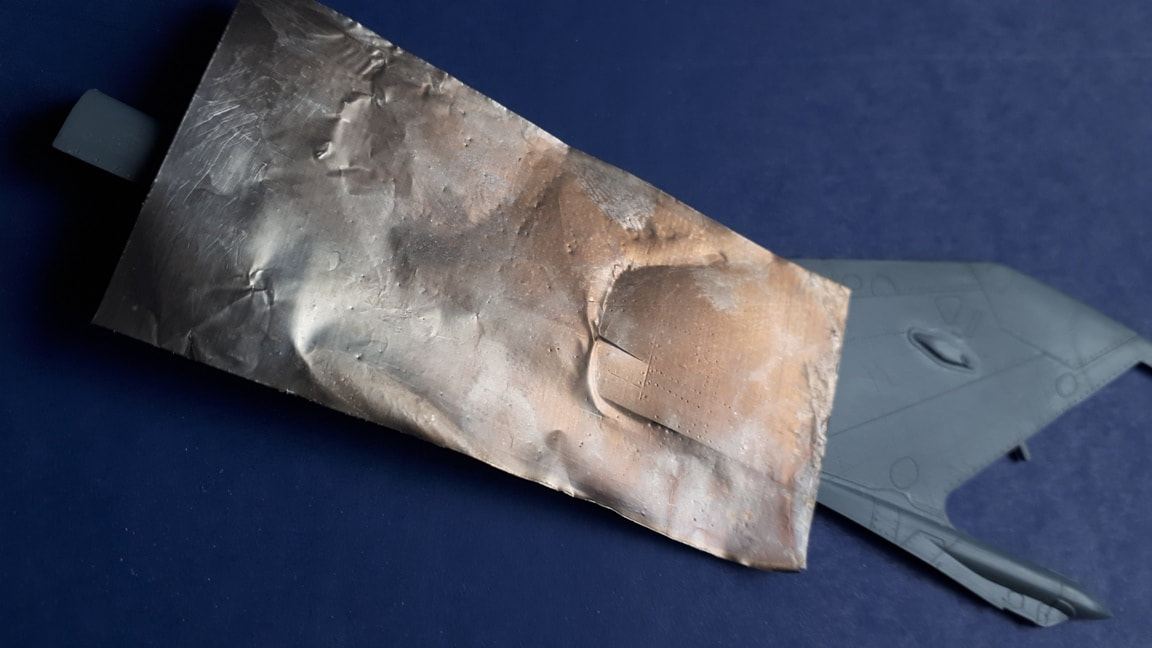
The aluminium foil - this is probably the only time you actually want to go with the cheap, no name stuff....the thinner the better. Cut your foil into small, manageable sections (that will mean different things to different people, but typically, these are squares maybe 6 x 6 inches. That's about 150mm by 150mm in real life. Weigh them down in a pot of water and boil them with eggshells. Please, do not scald yourself. I will not be held responsible... The foil will nicely weather and stain, and in the process make some very interesting patterns of discolourations, some of it just screaming to be used in high heat areas of your model. The amount of time in the boiling water will depend on you. Also, I have not been able to pull foil out of the water that didn't appear mangled, but I quickly found that this doesn't matter much. It straightens out fairly easily prior to application, and even moreso during burnishing down. Here's what it all looks like:
The aluminium foil - this is probably the only time you actually want to go with the cheap, no name stuff....the thinner the better. Cut your foil into small, manageable sections (that will mean different things to different people, but typically, these are squares maybe 6 x 6 inches. That's about 150mm by 150mm in real life. Weigh them down in a pot of water and boil them with eggshells. Please, do not scald yourself. I will not be held responsible... The foil will nicely weather and stain, and in the process make some very interesting patterns of discolourations, some of it just screaming to be used in high heat areas of your model. The amount of time in the boiling water will depend on you. Also, I have not been able to pull foil out of the water that didn't appear mangled, but I quickly found that this doesn't matter much. It straightens out fairly easily prior to application, and even moreso during burnishing down. Here's what it all looks like:
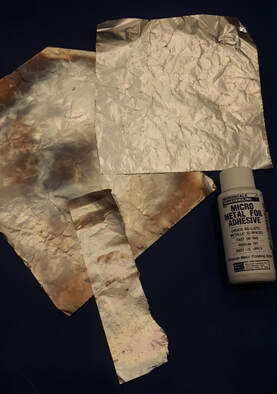
You can see what I mean by the crumpled look. None of this was an issue, and the Microscale Industries Foil Adhesive is beautiful stuff. I applied some when I was experimenting with this procedure, and I even had the foiled part under water for a few days, completely submerged. I tried removing it from the plastic after a few days as well, and the stuff didn't want to yield. I have no reason the believe that the application isn't permanent with time.
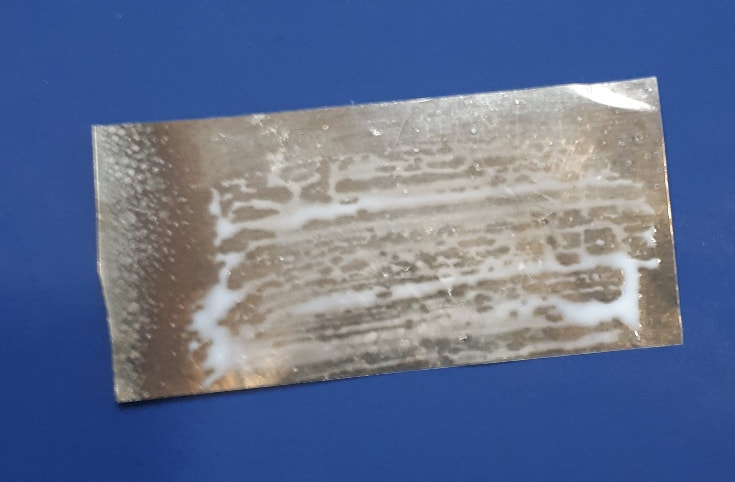
Aluminium foil has a shiny side and a shinier side, and which you apply the adhesive to doesn't really seem to matter, especially if you flat coat at the end. I always do and I always will, because it looks great to me. Just as you clean the model with rubbing alcohol, do so with the adhesive side of the foil. Apply the adhesive with a nice, wide, soft brush, but don't cake it on. You want a thin layer of adhesive, and too much will be visible below, giving your panel a sort of odd, cushioned look. Sometimes, the adhesive, almost immediately after application, will bead up on you. That's bad. See Below.
Aluminium foil has a shiny side and a shinier side, and which you apply the adhesive to doesn't really seem to matter, especially if you flat coat at the end. I always do and I always will, because it looks great to me. Just as you clean the model with rubbing alcohol, do so with the adhesive side of the foil. Apply the adhesive with a nice, wide, soft brush, but don't cake it on. You want a thin layer of adhesive, and too much will be visible below, giving your panel a sort of odd, cushioned look. Sometimes, the adhesive, almost immediately after application, will bead up on you. That's bad. See Below.
|
|
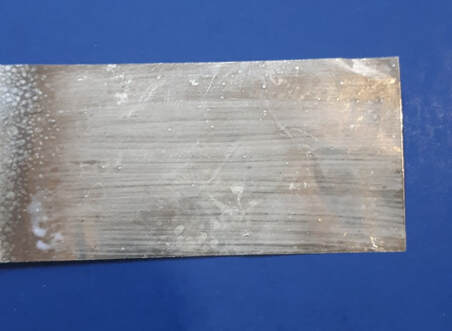
Sometimes, you can still even this out with a few brush strokes, but not too many, since as the adhesives dries, it will live the brush strokes behind and visible. If you get this beading and can't immediately even them out, wipe clean with rubbing alcohol and repeat. Here's what it should look like:
The brush marks are quite exaggerated here. Thank you, digital photography. You'll find this is acceptable, and if you find your brush strokes manifested on your applied panel of foil, you can still take it off, clean with alcohol, and give it another shot. That permanence I mentioned earlier comes after a couple of days or so.
The adhesive is then allowed to 'dry', and it completely disappears as it does. Once it cannot be seen anymore, it can be applied to the place on the surface of your model where you want it and lightly pressed down with your finger, followed by a slightly heavier burnishing with a burnishing tool. The next time you are out at the local bar and grill making a sacrifice to the Chicken Wing Gods, grab a few of those wooden toothpicks they give out. They are great for this, and are gentle enough that they will not scuff the surface if your're not excessive in the pressure you apply.
The adhesive is then allowed to 'dry', and it completely disappears as it does. Once it cannot be seen anymore, it can be applied to the place on the surface of your model where you want it and lightly pressed down with your finger, followed by a slightly heavier burnishing with a burnishing tool. The next time you are out at the local bar and grill making a sacrifice to the Chicken Wing Gods, grab a few of those wooden toothpicks they give out. They are great for this, and are gentle enough that they will not scuff the surface if your're not excessive in the pressure you apply.
You will find that the rivets and panel lines are just visible below the foil. Go back over these with the compass needle again, being careful of the angle you hold it at as you follow panel lines to avoid tears. Application pressure here is not much more than the weight of the compass itself, but that will only apply to you if you are using something else. Point being, not a lot of pressure is necessary.
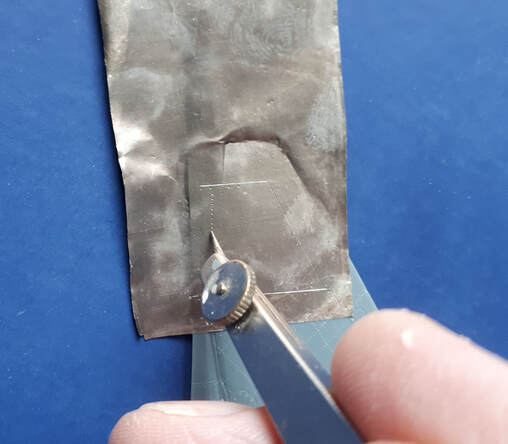
After the panel is finished, trim its outer edges with an Number 11 knife, and please, use a new blade. This process is actually pretty forgiving to slips of the blade, and can generally be treated with a light reburnishing. Don't burnish, at any point, in areas where you will be removing foil. It won't be a disaster if you do, but it will make removal easier. Also, sometimes you don't trim through a corner, so be careful when lifting off excess foil, as the wanted foil at the corner(s) may begin to lift off, too. Also, easily reburnished.
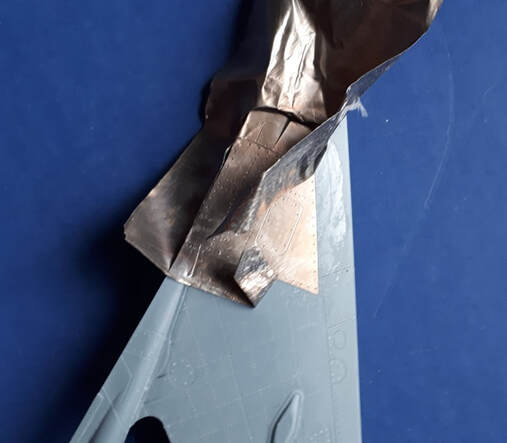
Adjacent panels are applied in much the same way. Above, you can see the slight overlap over the first panel, but this easily comes off after trimming and I have never had the foil on top taking the foil below it with it. I give credit to the Microscale adhesive. To me, it just comes off as the perfect product for this.
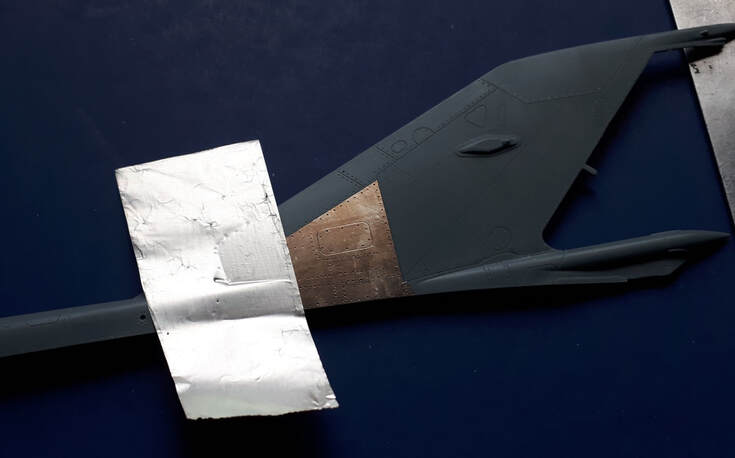
The panels in these photographs are kind of nonsense. They are not the ones I used on my kit, and I used them for tonal contrast. All in all, this was an enjoyable project, if a bit long for the number of panels. I think that the effect is very convincing. Decal application was done directly to the foil with no gloss coating, but was sealed with the flat coat.
A note about compound and complex curves: aluminium foil is very forgiving here, and it even went well on the RWR sensor above the national insignia with no difficulty. The only thing I ended up painting was a filled in and sanded seam of the aluminium foil around the nose (which I strategically chose to be on the bottom ahead of the nose wheel bay). Spraying, as needed, was done with a shade of Alclad that was similar to that of the aluminium foil, and was very minimal. Minor weathering was applied, too, but kept subtle, as on this type of surface, it could be easily overdone.
A note about compound and complex curves: aluminium foil is very forgiving here, and it even went well on the RWR sensor above the national insignia with no difficulty. The only thing I ended up painting was a filled in and sanded seam of the aluminium foil around the nose (which I strategically chose to be on the bottom ahead of the nose wheel bay). Spraying, as needed, was done with a shade of Alclad that was similar to that of the aluminium foil, and was very minimal. Minor weathering was applied, too, but kept subtle, as on this type of surface, it could be easily overdone.
As with any modelling procedure, don't be afraid to experiment and modify as you see fit. I hope you found this enjoyable and inspired you to try it, or something similar, and, most of all, that it brings you pleasure in your building. If you have any questions, comments or suggestions, please contact us. We would love to hear from you!